The Ultimate Guide to Roller Shades Ordering and Measurement: Transform Your Windows with Precision
When decorating your home, shades play a pivotal role in setting the mood and style of any room. However, the process of ordering and measuring for new window treatments can seem daunting. Fear not! Our comprehensive guide will walk you through each step, ensuring you achieve the perfect fit and look for your windows. Whether you're a seasoned decorator or a novice homeowner, these tips will help you make informed decisions and avoid common pitfalls.
Step 1: Confirm the Product Type
Before diving into measurements, it's crucial to know what type of shades you need. Are you looking for blackout shades for the bedroom, sheer curtains for the living room, or maybe something more decorative? Defining the product type will guide your choices for fabric, accessories, and installation.
Step 2: Choose the Right Fabric
Selecting the fabric model is not just about aesthetics; it’s also about functionality. Different fabrics offer varying levels of light filtration, insulation, and privacy. Make sure to choose a fabric that aligns with your needs and complements your room’s decor.
Step 3: Select the Perfect Accessories
Shades accessories, such as rods, finials, and tiebacks, add the finishing touch to your window treatments. Confirm the style of accessories that best suit your shades and overall room design. Accessories not only enhance the look but also affect the functionality of your Shades.
Step 4: Accurate Measurement of Product Dimensions

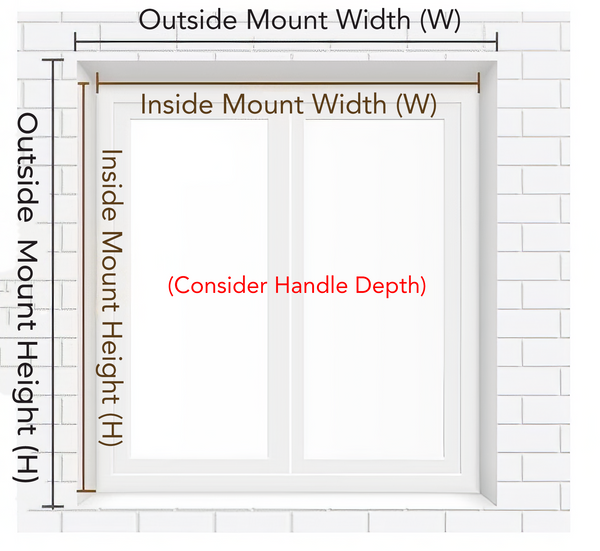
Getting the right dimensions is critical. Measure the width and height of your windows accurately. Incorrect measurements can lead to ill-fitting Shades that do not provide the desired coverage or aesthetic. Here’s a quick guide:
- Inside Mount Shades: Finished width = inner frame width (W) - 5mm; Finished height = inner frame height (H). Measure at three points (top, middle, bottom) and use the smallest measurement.
- Outside Mount Shades: Finished width = outer frame width (W) + 15cm; Finished height = outer frame height (H) + 15cm. Adjust according to the actual site conditions.
Step 5: Determine Installation Location
Identify where you want to install your shades. Consider factors like window sill height, floor-to-ceiling windows, and any potential obstructions. This step ensures your shades are both functional and visually appealing.
Step 6: Inside Mount vs. Outside Mount

- Inside Mount: Ideal if your window has a recess deeper than 7cm. This option provides a streamlined look.
- Outside Mount: Necessary if your window recess is less than 7cm or nonexistent. This method covers the entire window and can make your windows appear larger.
Pros and Cons:

- Inside Mount: Offers a sleek, modern look but requires precise measurements.
- Outside Mount: Provides better light control and insulation but can be more prominent and requires more fabric.
Step 7: Specify Pull Bead or Motor Direction
Confirm the direction for the pull bead or motor. Most shades default to a right pull, but you can specify left pull or motorized options based on your convenience and room layout.
Step 8: Special Customer Requirements
Ensure any special requests are noted, such as extending or shortening the pull bead length. Customization can make a significant difference in the functionality and satisfaction of your window treatments.
Special Notes:
- For widths exceeding 2.8 meters, the shades must be divided into two sections due to fabric width limitations, with a pull bead on each side.
- The height should not exceed 2.8 meters due to space constraints of the curved outer casing.
Finalizing Measurements and Installation

Tools Needed:
- Screwdriver
- Pencil
- Tape Measure
- Electric Drill
Installation Steps:
- Measure and mark positions with a pencil.
- Drill holes at the marked points.
- Insert expansion plugs into the holes.
- Secure the installation brackets with screws.
- Snap the plastic buttons on the installation brackets into the track and press upward until secure.
- Complete the installation.
By following these detailed steps, you can ensure a smooth and successful blinds installation process. Not only will your shades fit perfectly, but OUOIO Shades will also enhance the overall aesthetic and functionality of your space. Happy decorating!


